Search
Search results
Purple Phoenix Games (2266 KP) rated The Quest Kids in Tabletop Games
Mar 26, 2021
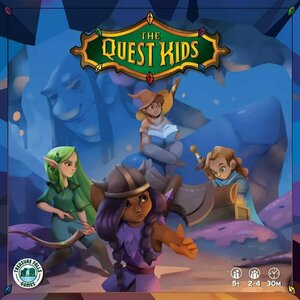
Have you heard of The Quest Kids? It’s a YouTube channel featuring six young adventurers as they use powerful “Tolk Gems” to help complete quests and protect the city of Treasure Falls. These kids are always striving for good and understanding, and are not afraid to do what is right in all scenarios. These Quest Kids are ideal role models for young children, and when I heard of board games based on the IP I knew my kids and I would love the games. Was my Faith Tolk Gem pointing me in the right direction, or has it gone dark for me? SPOILER: This game is great!
The Quest Kids is a dungeon crawler style board game for players as young as five years of age. Yes, FIVE! In it, players are acting as one of these Quest Kids, attempting to explore the cave of Tolk the Wise. The Quest Kids will find abilities to enhance their own, treasures to collect, and silly bad guys to scare away within, and the player with the most stars (VP) at the end will win the game!
DISCLAIMER: We were provided a copy of this game for the purposes of this review. This is a retail copy of the game, so what you see in these photos is exactly what would be received in your box. I do not intend to cover every single rule included in the rulebook, but will describe the overall game flow and major rule set so that our readers may get a sense of how the game plays. For more in depth rules, you may purchase a copy from the publisher online or from your FLGS. -T
To setup, place the large game board on the table and populate it with the green, gray, and red Dungeon Tiles according to the rules. Also prepare the card decks and place them appropriately in their spaces on the board. The Treasure Tokens are placed in the Treasure Bag. Each player will receive one Quest Kid Player Mat and matching figurine. In addition each player will receive three starting Health Cards, one Quest Card, and one appropriate starting Ability Card. The game may now begin from the entrance to the cave!
On a turn players will be able to have free movement around the board exploring tiles and resolving them in turns. Green tiles are always good for the players, Gray tiles may have some bad guys but are predominantly good, and Red tiles are littered with those silly bad guys that will need to be scared away. A player will travel to a board location and encounter a Dungeon Tile by flipping it over and collecting the resources shown or attempting to scare away the bad guys. Bad guys can be scared by discarding the printed Ability Cards on their tile. Once discarded, the player collects the tile to their Player Mat for stars at game end.
Sometimes players will encounter a bad guy they do not possess enough Ability Cards to scare away. In these scenarios the player may ask the other players for help. Nonactive players may then offer Ability Cards from their stash in order to help achieve the goal. For every Ability Card donated to the cause the donating Quest Kid will receive one Kind Kid Card. Kind Kid Cards are always great and can be resolved at ANY time during the game. Should a player encounter a bad guy they cannot scare away and other Quest Kids cannot help with Ability Cards, the active player will suffer a loss of one of their Health Cards (worth two stars).
Some tiles or Quest cards will instruct the player to draw one or more treasures from the Treasure Bag. Most treasures are good and provide stars, but some are blobs that eat stars. Each Treasure Token also has two values. The top value is for the normal amount of stars. However, the bottom value is worth more stars if the controlling player matches the Quest Kid printed on the token. Some treasure may be worth just one star unless the Quest Kid is a match, in which case it is then worth three stars, for example.
Turns continue in this fashion until all Dungeon Tiles have been resolved or a stalemate reached. At this point all players count up their stars they have collected from various sources and the player with the most stars is the winner!
Components. This is a kids’ game, can we all agree? THIS kids’ game, however, boasts some of the most interesting and wonderful components I have seen. The board is huge and depicts a magical cave. Super cool. The tiles are easy to read and understand, as with all the iconography. The Quest Kids themselves all have the same abilities (unless the expansion is added – and the review for that is coming soon), so that smaller children are not burdened with having to remember their special abilities. There are these plastic Tolk Gems that can be collected during the game and children absolutely flip for these things. And did you see those colorful and very big minis? I mean, come on! It’s a kids’ game! They LOVE minis! The game also comes with cardboard standees in case your children cannot handle the minis carefully enough.
Here is the deal. I absolutely adore these Quest Kids games. They are absolutely the perfect difficulty for young gamers who are ready to step up from the Candy Lands and Chutes & Ladders. Now, the box suggests 5+ but my 4-year-old did just fine with it, so take that with a grain of salt. Having had him already familiarize himself with The Quest Kids characters in The Quest Kids: Matching Adventure, this was an easier process getting this game to the table for us.
The game gives an exciting dungeon crawl experience for younger children, and it’s honestly something I never really knew I needed in my life until I now have it. It is so simple to teach and play and definitely encourages helping other players, if even just because you receive those Kind Kid cards in return. Anything to create that helpful player atmosphere to prepare them for heavier cooperative games is much appreciated.
Please do not misunderstand me. The Quest Kids is targeting younger players, but I do believe that any aged gamer could appreciate and have a good time with this. It certainly will not fill the void of other dungeon crawlers, but if you need a fix and would like to spend 20-45 minutes playing something to scratch that itch, then pull out your copy of The Quest Kids. It is super-light, colorful, and is a perfect stepping stone to bigger cooperative games. Purple Phoenix Games (with special guest Finley) gives this one a Kind 11/12. Please visit the publisher’s website to pick up your copy, and have a great time introducing your children (or partners, in-laws, grannies, pets, whomever) to cooperative dungeon crawls that will have you leaving the table in a much better mood than when you sat down.


Purple Phoenix Games (2266 KP) rated Dreams of Tomorrow in Tabletop Games
Sep 17, 2020

Let’s talk about dreams. They can range from simply reliving a stressful day at work, to remembering THAT embarrassing moment from your past, to maybe even discovering that you have superpowers. In your dreams, there are endless possibilities – but what if they meant something more? According to Dreams of Tomorrow, our dreams actually serve a bigger purpose!
Dreams of Tomorrow is game of set collection that utilizes a shifting rondel (I had to look up the definition too) in which players are working to weave a series of dreams into a complete Dream Sequence. Set in the future, players take on the roles of Dream Engineers, who are tasked with creating Dream Sequences to be sent to the past in an effort to save the future. Can you weave the most powerful Dream Sequence to alter the path of your present life, or is the future doomed to fall?
DISCLAIMER: We were provided a copy of this game for the purposes of this review. This is a retail copy of the game, so what you see in these photos is exactly what would be received in your box. I do not intend to cover every single rule included in the rulebook, but will describe the overall game flow and major rule set so that our readers may get a sense of how the game plays. For more in depth rules, you may purchase a copy online or from your FLGS. -L
To setup the game, place the Collective Consciousness (the rondel) in numerical order within reach of all players. Reveal a number of Dream cards from the Dream deck, based on the number of players, and these cards will create the communal Dreamscape. Each player receives a player card, cubes, and meeple in their chosen color, and sets their resources to the starting numbers, as described in the rulebook. All players begin with their meeples in the first space of the rondel, and in clockwise order, will select and pay for a Dream from the Dreamscape to be placed in their Dream Catcher (waiting area). Once all players have selected a Dream, and adjusted their resources accordingly, the game is ready to begin.
Dreams of Tomorrow is played over a series of rounds in which players will take turns performing 2 actions: Move and Take Action. Movement happens sequentially around the rondel, and players may choose how many spaces to move. To move 1-3 spaces is free, but to move more than 3 spaces will cost a number of resources. When a player decides to end their movement, they will then take the action indicated on the space on which they landed. These actions include: Gaining resources, Catching a Dream, Weaving a Dream, or Activating a Dream Ability. Gaining resources is pretty self-explanatory, and there is one neat thing to note: even if it is not your active turn, most of the rondel spaces have a Shared Effect, which grants an off-turn action to all non-active players. Catching a Dream means that you pay the requisite resources and select a Dream from the Dreamscape. Any caught Dreams go into your Dream Catcher until you are able to perform the Weave a Dream action. When you Weave a Dream, you again pay the requisite resources displayed on the Dream card and move the Dream from your Dream Catcher into your Dream Sequence (play area). To Activate a Dream Ability, you select a Dream card in your tableau, and use the ability printed on it. It is important to note that once Dreams are woven into your Dream Sequence, they will overlap each other, and only one Dream Ability will ever be available for use, so create that sequence wisely! Play continues in turns until one player has woven a Dream Sequence of five Dreams total. The round ends once all players have taken the same number of turns, and then final points are counted. The player with the highest score is the winner!
So all-in-all, how is Dreams of Tomorrow as a whole? I actually was very surprised at how much I enjoyed this game. When reading through the rules, it seemed kind of complicated and I was a bit worried before my first play. Once you actually get playing, however, the game is pretty intuitive and simple to play. One thing I particularly enjoyed about this game is its iconography. With only three resources and four actions, there are only seven icons of which to keep track. It keeps the cards from being cluttered with text, and makes the costs/abilities clear to understand. The iconography of the Dream Abilities, however, can be a liiiittle more complicated, but the game does come with Reference Cards which explain what every single icon means!
Another neat thing I enjoyed about this gameplay is the addition of Shared Effects. Even if you are not the active player, you will always gain some resource on everyone else’s turn. That adds an extra element of strategy because you have to amass your own resources for Dreams, but you have to be careful not to be giving your opponents too much extra help for themselves! Probably my favorite part of Dreams of Tomorrow are the actual Dream Abilities themselves. Performing the regular turn actions are pretty straight-forward, but Dream Abilities are more special and allow you to do even more on your turn. For example, some Dream Abilities allow you to change directions, move extra spaces, or even alter the Collective Consciousness, re-arranging the cards in a way to benefit you and hopefully hinder your opponents. The Dream Abilities are literal game-changers, and they really keep all players on their toes.
Talking about components, this game is of a pretty good quality. The cards are nice and sturdy, the player boards are decent, and the meeples and cubes are your standard wooden tokens. I’ve said in reviews before, but I always appreciate when games include Reference Cards for players, and Dreams of Tomorrow certainly delivered on theirs. The cards are clear, concise, and helpful during play. The artwork of this game is very vibrantly colorful and just plain pretty to look at. I found myself getting distracted by admiring the artwork, or catching Dreams based on their artwork, instead of taking their point-values or resources requirements into consideration. Oops. That’s just my bad, but the artwork really helps make the game more immersive.
Overall, I would say that Dreams of Tomorrow is a great little game. Admittedly, the rulebook is kind of daunting and seems a little overly complicated at first, but once you get into an actual game, it flows very quickly and easily. After just one turn, I got exactly what was happening and had no further questions about the gameplay. It really went above and beyond my expectations, and is one that I definitely look forward to bringing out in future game nights. Purple Phoenix Games gives it a dreamy 10 / 12. Check this one out if you haven’t before, it may just be the game of your dreams. (Ha, get it?)


Purple Phoenix Games (2266 KP) rated Mob Sitters in Tabletop Games
Sep 17, 2019

I feel like everyone at some point in their lives has been a babysitter. Either for younger (or maybe even older?) siblings, or for the entire neighborhood – it kind of seems like a rite of passage. I definitely had my share of babysitting gigs growing up, but none as exciting and high-energy as the one presented in Mob Sitters!
Disclaimer: This preview is based upon a preview copy of the game. The final components, rules, and gameplay may differ from those described in this review! -L
In Mob Sitters, you take on the role of a babysitter working for the mob. Just because crime pays the bills doesn’t mean these mobsters don’t have families! You’re no ordinary babysitter though, otherwise you wouldn’t be mixed up with the mob. You’ve got plans of your own – whether it’s stealing from your boss, ratting out your rivals to the cops, or actually just some innocent babysitting, there’s money to be made here!
Mob Sitters is played over six rounds in which you take turns playing cards (some hidden and some not), targeting or reacting to your opponents, and collecting that sweet sweet money. Let’s break it down. To start the game, each player receives a player mat and deck of cards for their chosen character. There will be 8 characters in the final game, but only 6 are present in the preview copy. The different characters do not have any special powers or abilities, they just have different artwork on their cards! Shuffle your decks, draw a hand of 6 cards, determine a starting player, and you’re ready to go.
Each player’s turn consists of 6 steps (Steps 1-3 are not applicable in round 1, and Steps 4-6 are not applicable in the final round). Step 1 is to earn money – any cards with a monetary value that are in your play area are moved to your Safe and will count towards end-game scoring. It is important to note that cards that earn you money (Steal and Job cards) must be played face-up into your play area. Step 2 is to reveal and resolve any Accusation cards in your play area that you want to. Accusation cards allow you to target an opponent’s Job/Steal card currently in play, in an attempt to discard it to their Cops/Boss piles, respectively, to count against that player in end-game scoring. The targeted player does not have to sit idly by and watch their money go down the drain, however. If the targeted player has a Reaction card face-down in their play area, they may reveal it to deflect the blame to yet another player! If you successfully deflect the blame, that money will not count against you, but will instead count against the next player blamed who is unable to react to and shift blame to someone else. To play a Reaction card, it must already be in your play area – you cannot play one directly from your hand! The next step, Step 3, is to discard any remaining face down cards in your play area. In Step 4, you choose 3 cards from your hand and play them into your play area. Job/Steal cards must be played face-up, but Accusation and Reaction cards can be played face-down. During Step 5, you resolve any face-up accusation cards you may have played in Step 4. The final step, Step 6, of your turn is to draw 3 cards, bringing your hand back up to 6 cards. Play then moves on to the next player, who then will perform their 6 steps, and so on. After 6 rounds, the game ends. Scoring varies depending on how many players there are, but ultimately the winner is the player with the most money in their safe!
I know that sounds like quite a lot going on, but believe me when I say the game plays pretty well (and pretty quickly) once you’ve gotten the hang of the turns. On paper, the sheer number of steps per turn seems excessive and like it would bog down the gameplay, but in actuality, the actions performed in each step are simple and fast. Perhaps if the number of steps were condensed from 6 down to maybe 3-4, the gameplay would seem a little less daunting. There is some slight ambiguity between the types of cards and into which stacks they go – the rules call cards Job and Steal cards, but the player mat refers to Boss and Cop cards. Fortunately the cards have symbols that correspond to the different stacks, so when in doubt, check the corner of the card!
Let’s talk components. This is first and foremost a card game, and the cards I received are of good quality! They shuffle well, and feel sturdy enough to withstand many plays. The art on the cards is pretty cute, the colors really pop, and there are some fun puns to be found on several Steal/Job cards. As for the player mats, this is only a preview copy of the game so I just printed them out (apologies for my lack of access to a color printer!), but their text is clear and helpful for remembering turn steps. The components may change throughout the Kickstarter campaign, but so far they’re off to a good start!
So how does it play? For the most part, Mob Sitters plays pretty quickly and is engaging for all players. There’s a good amount of strategy involved, as well as some luck and a whole lotta take that. All players receive identical decks of cards, which are then shuffled, so although you know what cards are available to your opponents, you never know what they currently have in their hand. You’ve got to be watchful of which cards your opponents play, to see if you can deduce which cards they have remaining. Are they taking the offensive approach and accusing everyone? Or are they being more subtle and taking a defensive stance, deflecting all accusations onto others? You have to decide when is the right time to play your cards to ensure that you aren’t targeted by too many opponents. Your strategy is ever-changing to adapt to the cards currently in your hand, and that’s what takes Mob Sitters to the next level for me.
Mob Sitters is a quick, easy, and fun game for any sized group. Hilarity ensues when accusations result in all players pointing fingers and trying to deflect blame. Although it can be played with 3, I think this game is better suited for 4+ players. With a smaller group, some of the aspects of ‘take that’ can feel personal and lead to tension between players. But a larger group can eliminate some of the animosity caused by always being targeted by the same person the entire game. Overall though, I enjoyed getting to play Mob Sitters! It has a unique theme and simple, yet strategic, gameplay that will keep all players on their toes. In my communications with the designer, I have learned that the retail version of the game will include “Hidden Agenda” cards to provide each player with a secret objective. There is also an expansion already in the works – The Heavy Mob Deck – that will add more cards and more complexity for experienced gamers!
If you enjoy games of hidden information, take that, and a little bit of bluffing, definitely check Mob Sitters out! It’s more than the standard party game, but still fits the categories of light, fast, and easy to learn games for all players. I look forward to following this upcoming campaign, and I definitely will be playing my copy again!
Purple Phoenix Games (2266 KP) rated Zoom in Barcelona in Tabletop Games
Jan 5, 2022

Barcelona! One of my favorite cities I have ever visited. I have sweet memories and also sour memories of this wonderful place. I have walked the streets, tipped the street performers, performed at the Universitat de Barcelona, but I also have mistakenly happened upon a brothel at night and had my debit card stolen by the hotel maintenance staff while visiting. So there’s a wide range of experiences I’ve had in Spain. That said, as this game is set in Barcelona, I knew I just had to get it to the table ASAP, and I found a gem for my collection.
In Zoom in Barcelona, players are photographers competing in a local photography contest. Judges will dictate the preferred sites, and the contest will have an over-arching theme, while players also race to take shots at the most opportune moment with the sunlight over the city. There are multiple ways to score points, and collecting a diverse portfolio of shots from the day will win a prize for the best photographer!
DISCLAIMER: We were provided a copy of this game for the purposes of this review. This is a retail copy of the game, so what you see in these photos is exactly what would be received in your box. I do not intend to cover every single rule included in the rulebook, but will describe the overall game flow and major rule set so that our readers may get a sense of how the game plays. For more in depth rules, you may purchase a copy online or from your FLGS. -T
To setup, follow the instructions in the rulebook; there are just too many to list here. However, the starting state of the board should look something similar to the photo below. The major components are the board, the Landmark photo cards, the Transport cards, Natural Light track, Themes tokens, and of course: the Dragon token.
NOTE: This review includes all rules found in the rulebook. For lighter games, players may omit certain rule options.
Turns are very simple in Zoom in Barcelona and consist of two phases – Move and Perform One Action. Players may move up to two connected spaces by walking, or more spaces by playing and discarding one of their Transport cards (shown above in hand). Players will be moving around the board like crazy attempting to arrive at certain locations so that they may take one action from the following: take one photo, visit an Information Point, or take the Metro.
Should the active player choose to take one photo, they must be currently at a location that matches one of the Landmark cards currently residing in the Judges’ Picks area (northeast corner of the board). To take a photo here, the player simply collects the card from the board and replaces it with another from the deck. Collecting Judges’ Picks cards is nice, but if players neglect to advance themselves along the Natural Light Track (southeast corner of the board), these cards will not score. Players will need to take photos at the leftmost location to be able to score two Landmark cards, with each subsequent Natural Light card allowing an additional two cards to be scored, up to a maximum of eight total cards scored. Players may also take photos of portions of the Barcelona Skyline by arriving at the corresponding Skyline Viewpoint spots on the board and collecting the token present (in a two player game, there is only one token at each spot, so the race is on!). These Skyline tokens can be combined at the end of the game for bonus points if combined in a specific order per the individual City Skyline Tokens dealt at the beginning of the game. Finally, players may take a photo of the Dragon in its current Lair by arriving on the Dragon’s location and choosing this action. By taking its photo, the Dragon allows players to freely take one of the Judges’ Picks Landmark cards from those on display, collect any Skyline building token from the board, advance the player’s token on the Natural Light Tracker, OR refresh all the Landmark cards on the Judges’ Pick area. In all of my plays, I abuse the Dragon to advance my token on the Natural Light Track primarily.
The player may instead visit an Information Point on the board in order to draw more or completely refresh their hand of Transport cards. Perhaps the player has a value 3 card, discards it, and draws three more cards offering higher value transports.
Finally, a player may instead choose to Take the Metro by visiting a red M spot and virtually teleporting to any other red M Metro spot on the board. This makes for quick travel across the city.
Play continues in this fashion until one player collects their eighth Landmark photo. The game then immediately ends and scores are counted per the rulebook. The photographer with the highest score wins the competition!
Components. This game has a lot of different types of components; the box is stuffed! All of the cards are nice, the cardboard components are great, and the wooden tokens are just okay. I would prefer more custom wooden components, as the game ships with just entry level pawn tokens and matching colored cubes. Something a bit more jazzed up would be appreciated here. Otherwise, the art is wonderful, the board is beautiful, and everything just looks really interesting when all setup. Per usual, Blue Orange has given us a beautiful game. (*Just bling out the wooden bits in your copy – I plan to with mine)
So wow, there are so many choices to be made in this game. Firstly, it’s a mad dash to collect that eighth Landmark card, but you just can’t ignore the Natural Light Track (if you play with it), because having eight cards but only able to score two or four is just like shooting yourself in the foot for no good reason. Zooming around town (I know, I had to) is so satisfying, like a board game treasure hunt, and snapping all these photos of memorable places just hits the spot for me. Yes, I am probably biased because of the setting and my fondness for it, but even if this were set in another location where I had no experience, I would still very much enjoy it.
I’ll tell you one thing. I feel bad every time I play this because I feel like a lazy one-trick pony chasing around the Dragon to exploit its power, and MAYBE grabbing a shot along the way. The Dragon is very powerful and allows players to do really helpful things throughout.
Yes, there are some minor rules I left out, but I think you all get the idea behind this game. I am absolutely in love with this one, and I am so glad it was suggested to me to try, and even more lucky that Blue Orange sent me a copy to review! Officially, Purple Phoenix Games gives this one a 5 / 6 for its beauty, fun mechanics, and incredible array of choices to be made along the way. I can see this one inching its way toward my Top 10 Games of All Time, but I suppose time will tell. If you are a fan of ours, and your tastes typically line up with mine, then please do yourself a solid and grab a copy of this one right away. It may be daunting to learn at first, but once it all clicks, I can guarantee you will see the cohesiveness and beauty of Zoom in Barcelona.
Oh, and if anyone finds my debit card, please return it. I “lost” it there in the Summer of 2000. Thanks.


Purple Phoenix Games (2266 KP) rated Robin Hood: Hero of the People in Tabletop Games
Jun 13, 2019
“Yer a hero, Travis!” … said no Hagrid to me ever in my life. However, I do enjoy playing heroes in my board games. As Robin Hood you live by few rules: rob from the rich, give to the poor, and save your fellow Merry Men. That dastardly Sheriff of Nottingham is out to foil and jail you and your crew. Can you use your skills to rob enough from the rich, recruit your fellows, and keep your bounty on your head low enough to win the game? Such is your plight in this one-player game from first-time designer, Rodney Owen.
Disclaimer: This review is for a Kickstarter preview. We are not being paid for this preview, but we were sent the game from the designer. Components and rules may be changed before the product and project is finished. -T
As this game is not yet in full production, I will paraphrase the rulebook here for you so you can get an idea of how the game plays. Then I will give my opinions on this little card game.
Robin Hood: Hero of the People is a one-player card game that is played over three phases. To win the game you must have all Merry Men and Maid Marian recruited and active, while the bounty on your head is less than 500. You lose by seeing the bounty at or above 1,000 or by playing through the entire deck of Story Cards without winning. You may set the difficulty level by choosing how much you would like the bounty to start at before you begin play (100, 200, or 300). The rulebook instructs you how to setup the game using several piles of cards to create the play area. Deal yourself three Loot (skill) cards and the game is on!
The first phase of the game is Robbing from the Rich. During this phase you draw three (or more depending on other cards currently in play) Loot cards from the big deck. These cards consist of different skills to use later – like Archery, Strength, Swords, etc. You will also find Gold and Influence cards. These Loot cards are needed to recruit Maid Marian and all the Merry Men, as well as used for negating powerful negative Story Card effects in the third phase of the game. Once you have drawn your Loot cards, you may play up to three of them into your Inventory in front of you (unless a card instructs you otherwise). Only your cards in the Inventory will be used to recruit and rescue Merry Men, or be affected by Story Cards.
You have placed your skills and bargaining cards in the Inventory. It is now time to use them to recruit your Merry Men! The second phase is the Actions phase. You have several options of actions to take on your turn, but you may only take one action. One option is to recruit Merry Men characters. Each character card begins the game face-down in a grid. The card backs show the recruitment costs (paid in skills) for each. They all have different skill cost combinations on each back so you must choose your Inventory cards carefully in the first phase. During the game some characters may become jailed through the Story Cards. Also on the backs of the character cards are the costs to rescue your friends from jail, and the costs are different than the recruitment costs. This throws a wrench into your plans as you are trying to recruit and protect all your Merry Men, just to have them thrown in jail and made unavailable to you. Curse you, Sheriff of Nottingham!
Also during this phase, in addition to recruiting and rescuing your allies, you may purchase King Richard cards, Sherwood Forest cards, or decrease your bounty. King Richard cards are very very costly (requiring up to nine skills to purchase!) but also very powerful and very helpful to your cause. There are three of these in the game and when you have used one you must discard it out of the game. Do you have an abundance of skills and Loot cards to use? Would you like to protect your Merry Men from becoming jailed? Well during this phase you may also purchase Sherwood Forest cards to begin building a hideout. It costs two Strength skills, but once you have acquired all six Sherwood Forest cards, most of the Merry Men are protected from being jailed. Huzzah! The final option you have in this phase is spending any three Loot cards from your Inventory to reduce your bounty by 100.
The third and final phase is the Story Card phase. During setup you are instructed to separate this deck into two piles, shuffle them independently, and place the Story Cards in set one on top of the story cards in set two. Set one cards are annoyances that can bleed you of skill cards or raise the bounty on your head. Annoying! The cards in set two are far worse, as they will jail your unprotected Merry Men and set you back further from victory… also whilst raising your bounty. Super annoying!! Curse you again, Sheriff!!
If no win or lose conditions have been met at this time, you will return to the first phase with this additional rule: switch your active character (you start the game with Robin Hood) with another character you have recruited in the grid. Each character has a different special ability to be used on your next turn as well as a different set of skills printed on the face that you may use as discounts for recruitment, rescues, and purchasing of King Richard and Sherwood Forest cards. Example: Much the Miller shows 1x Sword and 1x Strength. You can use his skills as a discount to purchase a Sherwood Forest card by spending just one Strength card from your Inventory. Time to stick it to the Sheriff!
So how does it all shake down? Overall I say the game is really good. It is unfinished, and has not yet made it to Kickstarter, and I suspect that has something to do with any drawbacks I have experienced. Upon reading the provided rulebook and attempting Game 1, I had several rules questions. Rodney was quick to provide answers and it made the game so much more playable and enjoyable. Since it is a solo game only, every decision you make directly impacts how the game is played (duh, right?). There’s nobody else to mess with your plans, nor help them succeed. There’s no AI or ghost player. Just you versus the game. I have played this many times now on different difficulty levels and have won and lost on each. It would seem balanced, however…
There are a few strategies I attempted to use on my different plays to see how they might add to the complexity and change the results. I noticed that I won more when I completely ignored Sherwood Forest and King Richard’s cards. Yes, one of the King Richard cards reduces the bounty by quite a bit, and that’s just in one turn, but the cost is so mighty that I rarely found them enticing enough to pull the trigger. Same goes for Sherwood Forest. Though the cards cost a paltry two Strength, I found that I needed those Strength cards to recruit or rescue my Men and could not justify spending two per card (and six total cards to build the hideout) for that protection. Your play style may vary, and I am itching to play again to try new things out. Maybe I’m wrong about Sherwood Forest. I think that’s a really great trait for a game – to have its players thinking about different strategies while not playing, and just waiting for when they can play again.
I have to say, I am very excited to see this go to Kickstarter, and to learn what Rodney has in mind for improvements to the components, or rule tweaks, and the almighty stretch goals. I might be backing this one, even though I have a great working version of it now…
Purple Phoenix Games (2266 KP) rated Lonely Undead in Tabletop Games
May 24, 2021

“I’m so hungry I could eat a horse.” Now, this is an acceptable saying that one might utter flippantly to anyone around them. However, “I’m so lonely I could bite the town Mayor” is generally something that would raise some eyebrows or nervous smiles from eavesdroppers. But why, I ask. Why are we okay with eating horses but not simply biting another human? Probably because of laws. I get that. But sometimes you just need a friend. Someone… like you.
Lonely Undead is a hand management, grid movement, zombie adventure game for one to four players with a super crazy theme. In it, players are Zs looking to make some friends in the neighborhood, but most unturnt neighbors are keeping their distance. So what’s a Z to do? Go bite and infect people so they can be friends forever, of course!
DISCLAIMER: We were provided a prototype copy of this game for the purposes of this review. These are preview copy components, and I do not know for sure if the final components will be any different from these shown. Also, it is not my intention to detail every rule in the game, as there are just too many. This preview will be highlighting the co-op mode with two players. You are invited to download the rulebook, back the game through the Kickstarter campaign, or through any retailers stocking it after fulfillment. -T
To setup, lay out the board somewhere on the table (thankfully the rules do not specify where, so go ahead and be a bit off-center this time). Zs (the players) all start in “Dead Center” of the board. The rulebook indicated how to construct the Living deck, and each deck of different types of cards should be shuffled and put in their place either on the board or just off it. For sake of ease, use the rulebook’s suggested placement of Living (so, NOT the Zs) tokens. Each player receives or chooses a Z to embody, receives two Aid cards, four Limbs, and the game is setup and ready to begin!
Lonely Undead is played over a series of rounds, with each round consisting of two phases: Z Phase and Town Phase. During the Z Phase, the active player will have four actions they may take from the following choices: Movement, Draw an Aid Card, Equip a Card, Sound Check, Attack, and Bite. Each Z has their own unique card with their special actions and other stats. A Z may move up to their Movement amount,including diagonally, for one action.
Aid Cards are very helpful to Zs, and for an action a Z may Draw an Aid Card to their hand. Aid Cards could be stat modifiers, or other special actions available to be used. Some Aid Cards are free to use, but if that text is not on the card, a Z will need to spend an action to Equip a Card to their Z.
When the Z is adjacent to a Living token, they must Sound Check it in order to identify the kind of Living they are stalking. To do this a Z rolls the Chance Die and applies any modifier rolled to their base stat on their card for hearing. This is compared against the Living card that is drawn to see if the Living notices the hunting Z. If the Z is successful in this Sound Check (winning all ties), then the Z may continue with their turn. If the Z fails the check, however, the Z will suffer the consequence detailed on the Living’s card. Once the Living has been identified through a Sound Check (successfully or not), the Z may next Attack the Living by rolling the Chance Die again and applying the modifier to the base attack stat. If successful, the Z flips the Living token over to reveal the injured side, notating that the Living does not need to be Sound Checked again, and is ripe for the bitening. If the Z fails an Attack, though, they will suffer any consequences detailed on the Living’s card. When a Living is injured, they are vulnerable to a Z’s Bite. The Z will roll the special Bite die in an attempt to meet their Bite range on the Z’s character card. A successful Bite means the Z collects a friend and moves that much closer to victory! A failed Bite means the Z must place a color-matched Bite token on the Living standee to signify they cannot be Bitten by that same Z again.
Once a Z has taken their turn, they will draw a Reaction card from its pile. Reactions could be either beneficial to the Z, or could be very very bad news. Some Reaction cards bring Dogs into the game, and these Dogs chase and bite the Zs that drew them. Every Dog bite causes damage to the Z and after all their Limbs are gone, they are perma-dead and out of the game. Other Reactions could cause a Car to zoom down the street, mowing over anything in their path (Zs, Dogs, Living, etc).
In the cooperative mode, players work together to gain 15 friends before 10 Living perish and are placed on the Death Toll tracker. Every two Living tokens on the Death Toll tracker forces the players to draw and enact a Death Toll card. Once the win condition is met the players win!
Components. Again, this is a prototype copy of the game, so components will probably be a bit different in the final version. That said, I do have some opinions here. Firstly, there are a LOT of components included in this game. I am sure that they will all receive some kind of improvement in the final copy, so I will not comment on quality. I was able to play the prototype several times and had no problems with the components doing their job. I do have a comment on the art style. It’s just not my favorite. Now, this is obviously personal opinion, and it certainly does does not turn me off from the game at all. I just need to get it out to the aether that a different art style or genre may fit the game a bit better.
That all said, I THOROUGHLY enjoyed all my plays of Lonely Undead. Once the turns start cookin, you just don’t want to stop playing. Yes, there are random events or spawns that cause some chaos for our heroes, chief of which are the Dogs. Those little buggers will chase you all over town to get that juicy bite off and take one of your Limbs. I hate to say this, but there were many times I hoped to draw a Car card so that it could run over the Dogs (now, in real life I love dogs, but they are perfectly annoying in Lonely Undead). The variety of Z special powers lead to interesting combinations when playing co-op or competitively. However, I honestly prefer the co-op mode here.
In co-op, players are (obviously) working together to Bite and infect as many Living as they possibly can. This makes for some strategic placement between players, as well as combat tactics when Livings are clustered together in a building. Perhaps one Z is better at handling Officers, while another can more easily prey upon Livings from outside areas. Being able to set strategies and tactics by working together has made for some very excellent gaming experiences.
I’m going to be honest, as I always try to do. When I opened up Lonely Undead and saw the art style, I was a bit turned off. But, as I learned the game and played through it several times, I grew to really enjoy the game. I think it’s a great example of taking a tired theme and breathing a bit of new life into it. Yes, zombies are trying to eat people, but typically in zombie games the players are working AGAINST the zombies, not AS the zombies. I think this is a very clever spin. I have certainly and purposefully left out a few rules as surprises for gamers who decide to back this one, and I would recommend that you at least check out the Kickstarter campaign. This may not be for everyone, and even if the art doesn’t change, it is definitely for me. Kudos to Shelby Matussak and Dead Lemon Games for a fine first entry into the gaming world.
CHOMP!


Purple Phoenix Games (2266 KP) rated The Artemis Project in Tabletop Games
Apr 6, 2021
I don’t know about you, but I spend more time than I should probably admit perusing Kickstarter and checking out new projects. Although, that is how I came across The Artemis Project. A game about exploration and colonization of one of Jupiter’s moons? Yes please! The campaign looked promising, the gameplay looked engaging, and the hype was real. Once I finally got the game, did it live up to my expectations? Keep reading to find out!
The Artemis Project is a game of dice/worker placement in which players are trying to build and sustain a prosperous colony on Jupiter’s moon Europa. Played over 6 rounds, players will take turns rolling and placing dice across the regions of the board to collect resources, construct buildings, recruit and train colonists, and partake in expeditions to explore this vast ice-land. To begin, follow the setup instructions in the rulebook for the appropriate player count. Each player receives a player board, dice, and markers in their chosen color. Populate the board for the first round, select a starting player, and the game is ready to begin!
Disclaimer: I do not intend to rehash the entire rulebook in this review, as there are just too many details. For a more in-depth look at The Artemis Project, pick up a copy from your FLGS or directly from the publisher! -L
To start each round, all players will simultaneously roll all 5 of their dice. Once players are happy with their results, the round is ready to properly begin. Each round is broken into three phases: Placement, Resolution, and Upkeep. To begin the Placement phase, starting with the first player, players will take turns assigning one die at a time to the 7 regions of the board. These regions are: Basecamp, Vents, Quarry, Gantry, Doorstep, Academy, and Outfitters. (I will explain each region in more detail in the next section!) The value of the dice placed in any region is important, because it will dictate what you are allowed to do, or when you are allowed to resolve the action for that region – so choose your placements wisely.
Once every player has placed all 5 of their dice, the Resolution phase begins. During the Resolution phase, each of the regions of the board will be resolved in order, allowing players to perform their region-specific actions. Resolution starts with Basecamp. Placing dice at Basecamp allows players to partake in Expeditions in an effort to earn Expedition Badges (which translate to end-game VP), as well as extra rewards. Each Expedition has a difficulty level which must be equaled or surpassed by the total of all dice placed on that card. If the difficulty is surpassed, the Expedition is a success and rewards are doled out accordingly, but if the Expedition fails, no rewards are earned by anyone.
The next 2 regions, Vents and Quarry, allow players to collect Energy and Minerals, respectively, and are resolved in the same way. Players will collect a number of resources equal to their played die value. Pretty straight-forward! Moving on to the Gantry region, the value of dice placed on any building tiles are considered bids for buying/constructing that building. You can bid against opponents for building tiles, but each bid must increase the previous amount. When resolving the Gantry, the highest value die on a tile is the winner, and that player must pay their die-amount in Minerals to collect that tile. Buildings are added to your colony, and allow you to perform special actions once they are fully-staffed (all colonist slots on the tile are filled).
Next is the Doorstep – depending on the value of dice you placed there, you will be able to recruit 1-3 new colonists. Recruiting a colonist costs you 2 Energy per new addition, and any new colonists you recruit can be placed immediately into any of your buildings (if space is available), or into your Shelter where they will wait to be used. The Academy region allows you to exchange a colonist of your choice for one of a different type/occupation, again, depending on the value of the die used. And finally, the Outfitters region does not resolved during this phase, because it’s action is performed immediately upon dice placement. Any dice placed to the Outfitters gives Tool Kits (used to manipulate die values at the start of each round) to the player, based upon the die value.
The remaining element of the Resolution phase is the Even card. At the start of each round, an Event card is drawn, and will pertain to a certain region of the board. During the Resolution phase, when that region is reached, the Event card will be resolved – either penalizing players or benefitting them in some way. I have purposefully left out a few elements of the Resolution phase for you to discover on your own!
Once all regions have been resolved, the round moves to the Upkeep phase. During this phase, all players can choose to move 1 colonist to a building tile, or swap any 2 colonists between buildings. This is not required, but can only be performed once during this phase. Next, if any players have fully-staffed buildings (all colonist slots are filled), they may activate the listed ability. And finally, for any colonists left in your shelter and not in a building, you must pay 1 Energy for each to keep them warm! The game board is now refreshed for the next round, a new starting player is selected, and the new round is ready to begin. After the 6th and final round, VPs are tallied – earned through number of building tiles, Expedition Badges, sets of resources, and sets of colonists – and the player with the most VP is the winner!
I know that seems like a lot, but I promise that once you start the first round, everything is pretty intuitive and the game flows well. The turn sequence and phases are logical and easy to understand. The game board itself has lots of helpful icons that work as reminders throughout gameplay, and the rulebook has a nice and concise round overview on the last page as well, which is easy to refer back to at a moment’s notice. I’ll go ahead and touch on components here, since I kind of already started to do so. The components in this game are great! The game board and cards are all sturdy and have colorful and immersive artwork. The dual-layered player boards are high quality, the colonist meeples are cute and effective, the building tiles and cardboard chits are strong and can definitely hold up to many plays, and the dice are easy to roll and read. Definitely an A+ on components from me.
I have to admit that The Artemis Project surprised me. At its core, it is a worker placement game, and that in and of itself lends itself to a certain gameplay. You’re trying to complete your own agenda, being the first to snag those important placements that you need to accomplish those goals, while also blocking opponents from doing the same. The thing that makes The Artemis Project unique is that the ‘workers’ in this game are dice. And their value is what dictates the resolution of each region. Just because you place a die in a region first, does not necessarily mean that you will get to resolve first – depending on how your opponents play, they could block you entirely! The use of dice adds an extra layer of strategy to the gameplay that really elevates it beyond a simple worker placement mechanic. Another great thing about this game is that there is no one way to win – there are several strategies that you could play by in an effort to earn VPs. Maybe you are trying to complete as many Expeditions as possible, or want to construct as many buildings as possible. Either strategy can work, and all strategies can easily be adapted and altered during gameplay.
I am so happy that I came across this game on Kickstarter. The game is strategic, engaging, and just fun to play. I’m not necessarily a huge fan of worker placement games, but the approach to the mechanic taken by The Artemis Project really puts a unique twist on it that adds to the gameplay. This is one KickStarter that was definitely worth the investment. Check it out if you haven’t heard of it, or if you’re looking to elevate your worker placement games. Purple Phoenix Games gives it an enterprising 10 / 12.


Purple Phoenix Games (2266 KP) rated VENOM Assault in Tabletop Games
Jan 25, 2021

What would you say if I told you I completely expected a game I received to fall completely flat for me but instead may actually unseat a revered similar game from my Top 10 list of games? That would be surprising, right? Well such is life, and such is this game. I do believe that VENOM Assault may knock off one of my favorite games: Legendary: A Marvel Deck-Building Game. That’s really saying something from me, so let me discuss a bit about why I state this.
VENOM Assault is a deck-building game very similar in style to Legendary: A Marvel Deck-Building Game (which, if I have to reference again will just call Legendary). Players take control of a team of (relative) wimps in order to help recruit the real elites and battle the evildoers plus their henchmen. Sound familiar? For this review I will be playing the Solo rules, which are the same as the multiplayer rules, but for one player. Novel, eh?
DISCLAIMER: We were provided a copy of this game for the purposes of this review. This is a retail copy of the game, so what you see in these photos is exactly what would be received in your box. I do not intend to cover every single rule included in the rulebook, but will describe the overall game flow and major rule set so that our readers may get a sense of how the game plays. For more in depth rules, you may purchase a copy online or from your FLGS. -T
To setup a game, please follow the rulebook as there is way too much to cover here in complete detail. The setup should look similar to the following photo. Here is what you will see: a space for the Mission scenario in the upper left corner. To its right a space for the active Event card. Next to that is the area for the VENOM Support cards to be displayed. Then the VENOM Support deck and discard areas. Below the Mission area is the space to track threat level and the current VENOM Leader’s Health and Defense values. Beneath those trackers is an area for four decks: the VENOM Leader deck, Reward deck, Event deck, and Event discard. To the right of this area is the Training Ground (recruitment zone), the Recruitment deck, and the Retirement pile. In the middle of the board are seven spaces to be populated with Reward cards and VENOM Leaders on top of the Rewards. Each player is dealt six Recruits and four Commandos and will shuffle these to create their draw deck. The players then draw five cards to create their hand and the game may now begin! Go save the world!
I will not be covering every aspect of a turn but will highlight the goings on. The Commander (first player) will draw and read the Event for the round. Events can be helpful for the players, extremely hurtful by advancing the VENOM plot, or even uneventful altogether. Next, player(s) will enter the Recruitment Phase. During this phase players will be using their entire hand to total the recruitment points that can be spent on recruiting those elite soldier, vehicle, and location cards from the Training Ground right into their discard piles.
Once the Recruitment Phase is complete, the Tactical Phase begins, and this is a large part of the game that helps differentiate it from others of its like. The players will choose one of the seven revealed VENOM Leaders on the map to attack in combat (if they choose – this is optional). Using the stats on the VENOM Leader card the players will adjust the Health and Defense values on the trackers on the board. If the VENOM Leader has any abilities that would trigger during this phase, then they trigger now. These could include Global Abilities as well. Once the Leader is done with their abilities, the players will choose one of their cards played to become the Combat Leader. This character now may not use their printed ability but will use their Combat Value (crossed pistols) to place combat dice on their card. The other team members in the combat will add dice to the pool as well if their abilities direct them. Next, the VENOM Leader will call forth their VENOM Support armies to aid them in the combat round. Once displayed, any hero Tactical Phase abilities can be resolved. If VENOM Support armies still are active, their abilities may be resolved at this point.
As the Tactical Phase ends, the Combat Phase begins. The Combat Phase is where the players are able to roll their combat dice in the hopes of besting the VENOM Leader’s Health and Defense values. Defense values dictate the dice values that need to be hit or exceeded to equal a successful attack. The Health value is how many successes are needed to defeat the Leader. However, once rolled the VENOM Leader will trigger any Combat Phase abilities at this time. Once complete the hero team will be able to resolve their own Combat Phase abilities, if any. Finally, the VENOM Support will resolve their Combat Phase abilities. Now the dice may be completely resolved against the Leader, after all abilities have been resolved. If the Freedom Squadron (heroes) defeated the Leader, they take the Leader and Reward cards into their VP pile. Depending on the Mission, these Rewards may be necessary to win the game, and all will have VP values.
After a lengthy Tactical and Combat Phase, the players then enter the Retirement Phase. The players may retire a card from their hand, thus removing the card from the game entirely.
Once a card has been retired (or not), the End of Turn Phase will help clean up the mess of the current round. Any other End of Turn Phase abilities will trigger, and used cards will be discarded to the appropriate areas and refills of key points on the board and players’ hands will setup the next round of play.
Once the Mission card’s success or failure stipulations have been met the game is over and, with any luck, the Freedom Squadron has defeated VENOM once and for all!
Components. This game boasts a large game board, a metric ton of cards, some dice, and some cardboard tokens. All the components are of fine quality and I have no issues with them. The art style used in the game is pleasing and, thankfully, not over-the-top gory or bloody or anything.
You may have noticed or thought that perhaps this game is taking inspiration from a cartoon/toy line from the ’80s, and I would very much agree with you. Could it be called Legendary: G.I. Joe? Maybe, but this one stands on its own, though very similar to the Legendary system. What I do like about VENOM Assault is the fact that it already comes with a large amount of incredible cards to be recruited. I do not know if I will ever feel the need for extra heroes in this game, whereas with the Marvel Legendary one can really go overboard trying to collect all the mini expansions and big box expansions just to find their favorite Marvel entities. Since VENOM Assault isn’t tied to any specific IP and is more generic overall, each character provided is its own thing, not a specific hero that one has grown up loving their entire life.
You see, the problem with those mini expansions in Legendary, at least for me, is that each one brings with it a host of heroes AND a host of new keywords and rules that must be remembered or referenced until it becomes second nature. In VENOM Assault, the rules stay the same and play is altered by the Missions and which characters can be recruited. I like a more reliable and static ruleset when I’m playing an intense game. So point goes to VENOM Assault here too.
Now, I was never into G.I. Joe and I am not at all a war or guns kinda guy, but I am really attracted to this game. I don’t necessarily think of my heroes as going in and shooting the place up, but rather taking Navy Seals-style tactical maneuvers to eliminate the target. So the point is that if you were never into that IP before, you should not feel alienated by this one. It appeals to all, in my opinion.
I said previously in this review that VENOM Assault is knocking on the door of bumping Legendary from my Top 10 games. I continue thinking about it even when I am not playing, and that is a mark of an excellent game for me. If I never think of a game again after playing, there is no way it remains in my collection. This one, however, has me considering different strategies in my head even now as I’m typing.
If you are in the market for a great deck-builder with worldwide espionage at its heart, I urge you to grab a copy of VENOM Assault. If you like the Legendary system but are looking for something just a little different, check this one out. If you just enjoy owning games that are fun and make you think, but also include a bit of luck in the dice rolls, then you owe it to yourself to play this. I really think you’ll enjoy it, as I have. Okay, time to setup another game.


Rest by Charlotte Gainsbourg
7.0![]() Rate It
Rate It
Album Watch
Sometimes it takes a personal tragedy to catalyse an artist’s practise, a crack in everything, to...
Pop